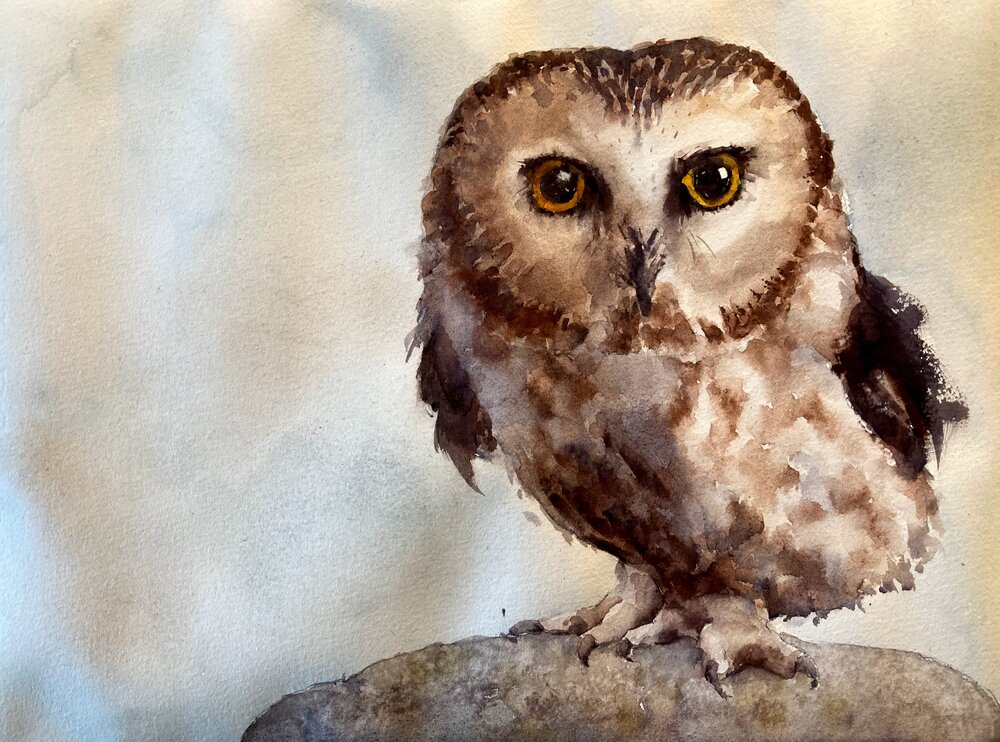
A saw-whet owl watercolor is a great subject for painting. Big eyes, fluffy feathers – what’s not to like!
So let’s paint an owl I said. I love painting owls I said. They’re really fun! Oh boy, oh boy what a toughie. I’d forgotten how hard all those delicate markings were and this almost ended up in the bin. But I continued on he finally came together. Just have faith and all will be well!
Introduction and Materials for your Saw-Whet Owl Watercolor
I’m working on a quarter-sheet (11×15) piece Fabriano Artistico paper. It’s 140lb cold press which is the most common type of watercolor paper. It’s great for painting on, takes paint well and allows you to easily soften edges and work wet into wet.
Colors used:
- Ultramarine blue
- Burnt Sienna
- Yellow Ochre
- Vermillion
- Cadmium lemon
Quite a limited palette for this painting. But there’s a lot of contrast in the reference photo so we don’t need to overdo it with the color palette.
Start With an Outline Drawing

I start with an outline drawing. I use a mechanical pencil with HB lead. Not too soft as we don’t want the graphite to smudge. The drawing has just enough detail that we know where to put the paint but not so much that it doesn’t give us some leeway.
Guess and Check the Values using a Value Scale


Using a value scale (I like this one from Paul Centore available from eBay) I first estimate the values for different parts of the reference. The light is coming from the right so we know that the darkest values are on the left.
First paint the shadow side of the owl
We’ve measured the values so we know what value the shadow side should be. I mix up a mix of ultramarine and burnt sienna to the right value and put it over the whole of the shadow (i.e. left) side of the bird. Yes it looks dark!!!! Keep the faith – we’ve measured it and we know it’s right! It just looks dark next to the white paper. You’ll start questioning yourself at this point but trust the process and it will work out.


Start to Put the Dark Markings In


Preferably while the shadow color is still wet start to put in the darker feathers on your owl watercolor. Using a fairly thick mix of burnt sienna drop in color into the shadow side. Also take the markings out into the light side. Try and keep some of the edges soft. You can soften them by taking a clean damp brush and wetting the paper right next to the wet color. The wet color will slowly seep into the paper you just dampened and make a beautiful soft edge. One of the best things about watercolor!
We can now see that our original gray wash wasn’t too much at all! Now the dark brown feathers are in it all starts to make sense.

Online Zoom Classes
I run online zoom courses regularly for both beginners and more advanced students. Please check out my workshop page.
Take the Dark Markings into the Head


Put in the Wings with a Few Flicks

Owl Watercolor – Use a Darker Mix for the Eyes


Now comes the best part! When we put in the eyes our owl watercolor will really come alive. We use a darker (and less runny) mix for this using burnt sienna and ultramarine. You may also want to use a slightly smaller brush for this slightly more fiddly work. Although if your round brush has a good point to it that will work well too.
We put in the pupil using the dark and make sure to leave a small piece of white paper showing. This will be our highlight. We leave the iris white (we can put that in later) and outline the eye in the same dark mix. As we don’t want a hard edge around the eye we quickly take a damp brush and soften the area around the eye. This makes it look like the eye is in shadow.
Wow what a difference yes! I always love this part!
When the dark part is dry mix up a lighter yellowy orange color (a red and a yellow or some cadmium orange) and put in the iris.
[activecampaign form=10 css=1]

Paint in the Beak for your Owl Watercolor

The beak is a slightly bluer mix of the ultramarine and burnt sienna. Make it darker on the left (where it is in shadow) than it is on the right. If you can soften the join where it meets the white feathers so much the better.
Owl Feet Have Subtle Shading

Now I have to admit something here. Bird feet are not my strong point and I always dread getting to this part. The way I’ve found to deal with them is to try and treat them as one big shape. If I don’t get too involved in the detail of talons and claws and such they come out much better. Just a wash of burnt sienna as a base color and a slightly darker mix to add in some shadows should get us most of the way there. A slightly darker mix still for the talons and we’re done. Phew!!!
We’re Almost Done!!!
Painting the Rock is Much Less Stressful!


Painting the rock is another favorite bit of mine. Start by just a flat wash over the whole rock. While it’s still wet spray some water and splatter some paint in. It will give the wash a mottled texture that really does look like an old rock. And it’s fun!
Finally – Some Flicky Wings to Give Some Character

I decided to depart slightly from the reference and liven up the wings a bit. Using a fairly dark mix of our trusty ultramarine and burnt sienna (slightly more burnt sienna to make it on the brown side) I used a flicky action with the brush to emphasize the wings. You have to take the plunge and have confidence with this technique. There are no second chances. But I think it definitely looks better this way.
Full Video of the Whole Process
You can see a video of the full painting below. I also have more videos on my youtube channel and you can also access them here.

Finally….
I hope you enjoyed this painting and thank you for reading/watching. After a slightly shaking start I really liked the way he turned out. I run online zoom classes regularly and if you would like to be notified of upcoming classes or new videos please sign up for my mailing list.