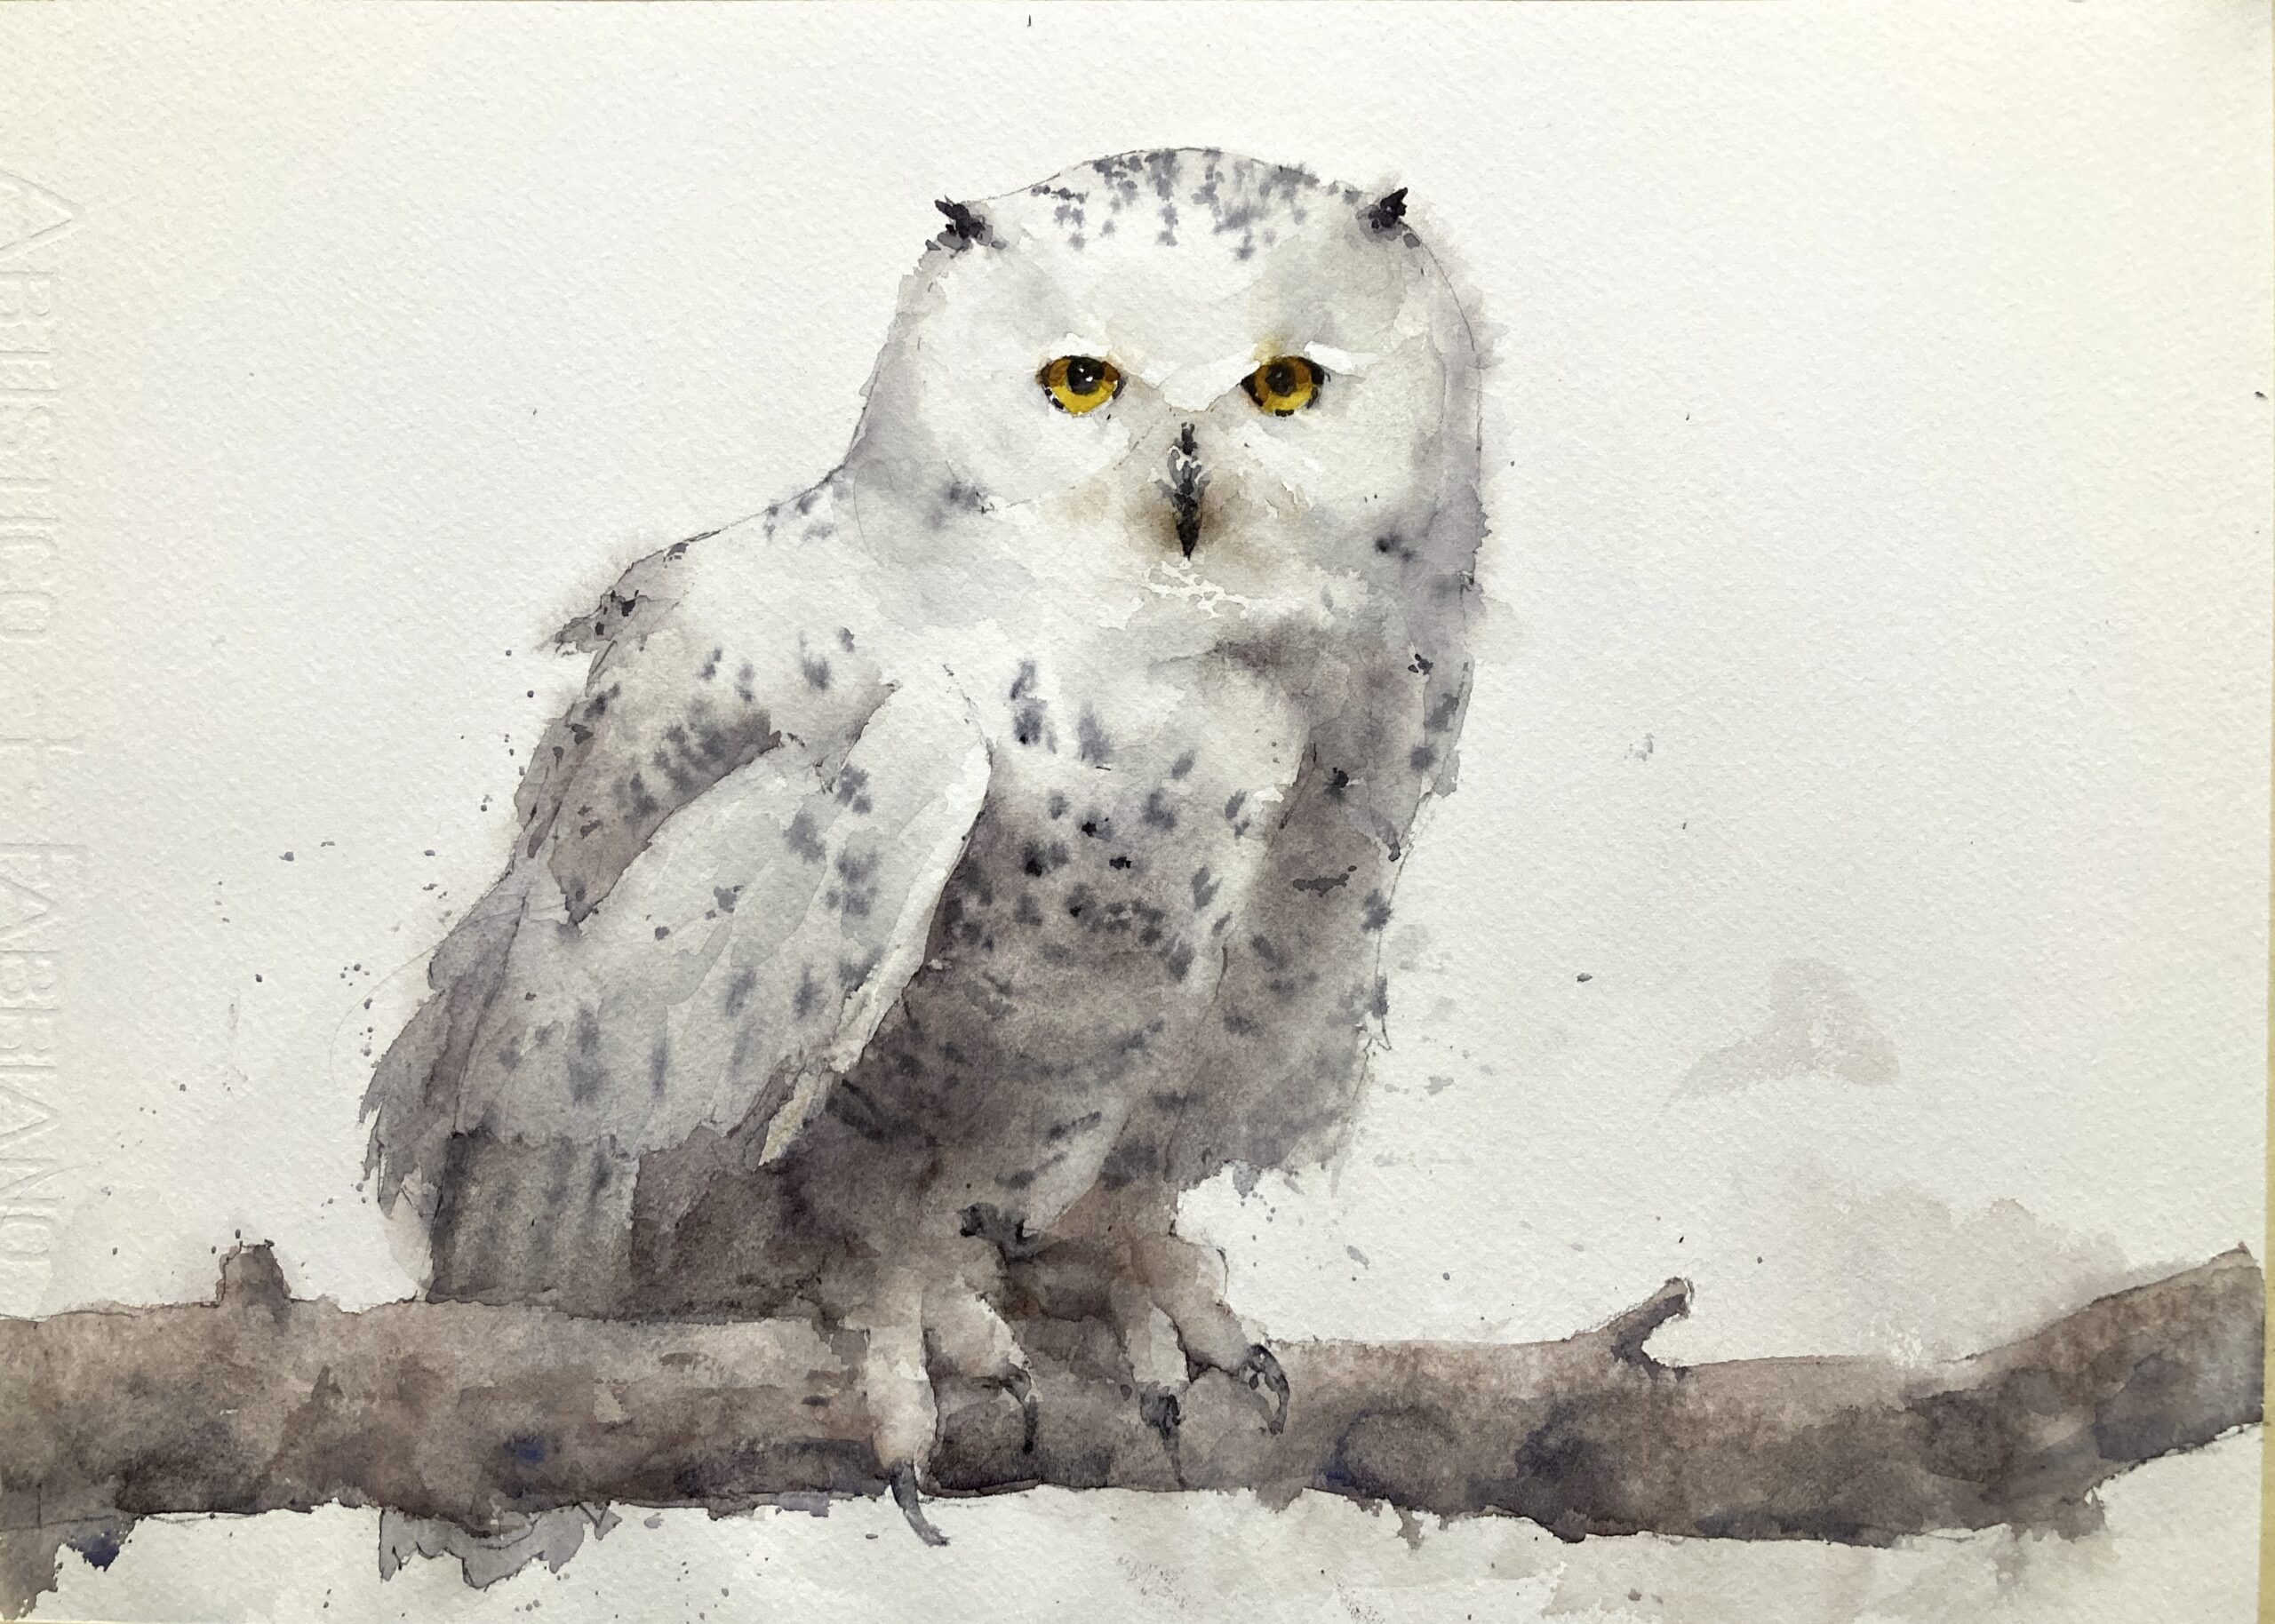
Spent an exhausting afternoon painting this snowy owl. Intense but great fun. This will probably be the third class in the series of six classes starting Jan 4th. There are still a few spaces for those who would like to sign up.

Watercolor paintings, tutorials, and videos
Spent an exhausting afternoon painting this snowy owl. Intense but great fun. This will probably be the third class in the series of six classes starting Jan 4th. There are still a few spaces for those who would like to sign up.
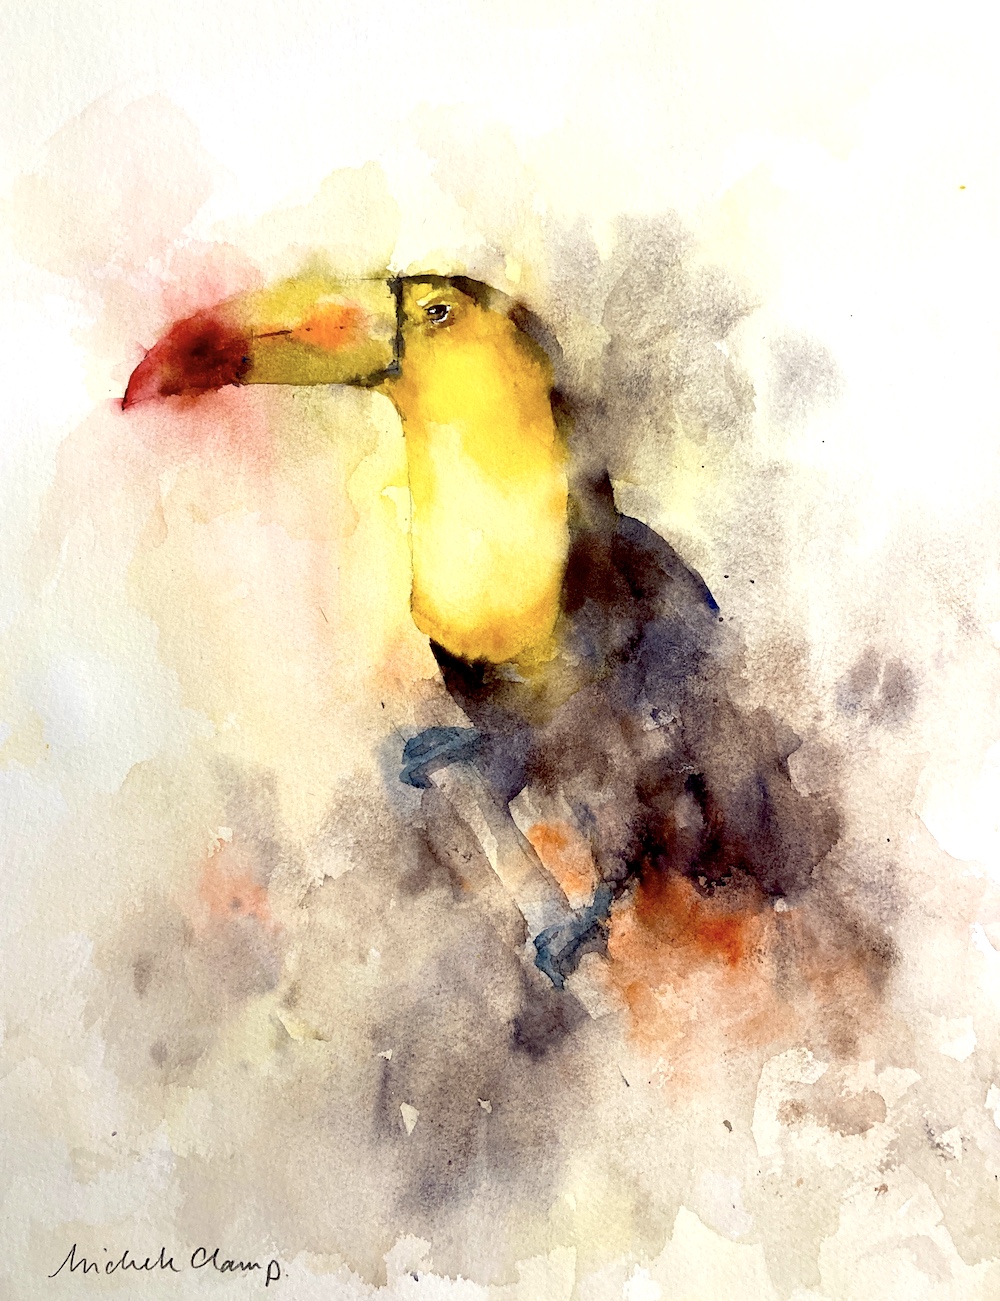
Painting a watercolor toucan was the subject today. Exotic tropical birds are often highly colorful which is very attractive but can pose some problems in paint. Each color needs to be modified as the from turns from the light into the shadow. This means a lot of close observation and a lot of mixing. However, for this reference I decided to simplify the colors a little. There was a lot of pretty bright green and yellow in the reference. I chose to tone down the green and also move the greenish yellow more towards orange. The aim was to have more unified color scheme. I also decided to ditch the jungle of foliage. For another painting this could have been fun to do but I wanted to focus in on the toucan bird and not have anything competing with it.
The plan for this bird watercolor was to proceed along the same lines as a previous cardinal watercolor painting. I wanted to start by putting down lots of regions of soft edged misty color and not pay too much attention to the edges. As the painting progresses more and more edges are put in until the bird magically appears from the mist. It’s a fun way to paint and I really like the resulting effect. It’s a technique very well suited to bird art and you can end up with an almost abstract painting at the end.
It’s pretty much essential to work on good 100% cotton watercolor paper for this. The paper can take a lot of working and also keeps damp for a fair while. This allows us to work into the paint wet-in-wet and soften edges as we go. It is possible to use cheaper paper but I wouldn’t recommend it unless you have a lot of experience under your belt. Trust me – I’ve learned this the hard way. My favored paper is Fabriano Artistico 140lb cold press but any cold press 100% cotton paper is fine. Arches can be a good choice for this. It is slightly more absorbent than the Fabriano and so stays damp for longer. This gives us more time to think as we’re painting without that panic that we have to get everything done at top speed.
A couple of good brushes are needed. I use Escoda reserva sizes 12,10 and 8. They point well and hold a lot of water. However a good synthetic (Princeton Aqua Elite, Black Velvet or Escoda Versatil) is fine and there isn’t so much sticker shock.
For paint I use mainly Da Vinci with a sprinkling of Holbein, Winsor and Newton, Daniel Smith and a couple of others. Any artists quality paint is good and some student paint is also fine (Cotman or Lukas Studio work well). My colors are lemon yellow, cadmium orange, vermillion, permanent rose, burnt sienna, cerulean blue, ultramarine and lamp black.


These two sketches were just to get the brushes warmed up and to play with the colors and the shapes. I mostly wanted to see how much detail I could lose but still keep the essence of the bird. It turned out that the chinstrap was a big focal point. A surprise was that keeping the beak too sharp really detracted from the rest so I made a note to be careful about keeping a lot of that beak soft.

As we’re going to be working loosely on this watercolor bird I don’t want too much graphite showing through. So the drawing was kept light and only the most essential lines put in. I lightly outlines the beak, the eye, the rough shape of the body and the legs and feet. For the feet I just drew in the main shape and didn’t bother noodling around drawing individual claws. They’re not the main focus and will just distract the viewer.
This first bit is lots of fun and is really hard to go wrong here. I took the main colors (mostly lemon yellow for the chest and beak and a mix of ultramarine/burnt sienna for the body) and just sploshed some paint in the rough area they should be. Use a big brush for this – we don’t want little dibby dabby lines at this point.


Once the paint dabs were down I thoroughly cleaned my brush, loaded it up with water and softened all the hard edges of the paint. Don’t be afraid of painting through the edges here. In fact really try and pull that paint through the outline of the bird into the background. Keep loading up with water and soften anything that looks like a hard edge – it should look nothing like a bird at this point!!
The only thing to be careful of is the eye area. We want to keep that area nice and crisp so try and keep dark paint away from that area. If, by chance, you do paint over it by mistake you can probably take a piece of paper towel and lift the paint off while it’s wet.


With my mix of ultramarine and burnt sienna I started putting in marks rough where the body was going to be. Again I pulled that color out through the edges of the bird into the background. Even pull it through the feet – these are fairly dark anyway and we can paint over them later. If you want to splatter some darks inot the wet paint go ahead. It will add some texture and visual interest. Just keep those edges soft! There shouldn’t be a hard line to be seen.
Now is a good time to take a quick break and let the paper dry a little. It’s probably quite wet from all that sloshing and we need it to be almost dry for the next step.
This to me is the magical part. We’re going to go in with some thicker paint (ultramarine and burnt sienna) and start putting in some edges. My aim is to put in as few edges as possible but still have it read as a toucan. I’m always surprised how few you really need.


I start by identifying what I think are the main areas of contrast to put in. The chin-strap around the beak is an obvious one as is the edge of the black feathers next to the yellow chest feathers. But you don’t need to outline the whole thing. Try just putting some paint in a couple of areas (soften the other side) and see how it reads. Our brains will often fill in the gaps. And if you feel it’s too harsh use a clean brush and soften it back again. We can always add hard edges but it’s tough to remove them once they’re down and dry.

I go around the bird adding in edges where I need them. It turned out in this one that it really didn’t need many at all. It can be hard to stop but better to stop too early rather than too late.

This final bit is where it all comes alive. We can put in the eye (with a little shadow around it), some color and shadow on the beak and some shadow on the yellow chest feathers. A little color and shadow for the feet and we’re pretty much done. This bit looks like the fancy bit but, as with a lot of painting, the main work is done ahead of time. These pieces are just icing and no amount of fiddling at this stage will fix mistakes made earlier.
When the details are in then take a breather, stand back and see if the whole thing hangs together. There may be odd bits that stand out too much or don’t stand out enough. But don’t noodle too long. It’s tempting to fiddle for ages but less is definitely more here. It’s so easy to ruin something that’s working with unnecessary detail.
I’m pretty happy with this toucan watercolor. I like the shapes, there’s just the right amount of definition, and the bird has some dignity to him. It’s very different from my previous work and doesn’t look like a slightly cartoonish illustration.
The full recording is viewable below.

I like to do video demos and classes and if you want to be notified of any upcoming streams please subscribe to my youtube channel or sign up for my mailing list. I also frequently update my shop page with original artwork if you’d like to own a painting for your wall.
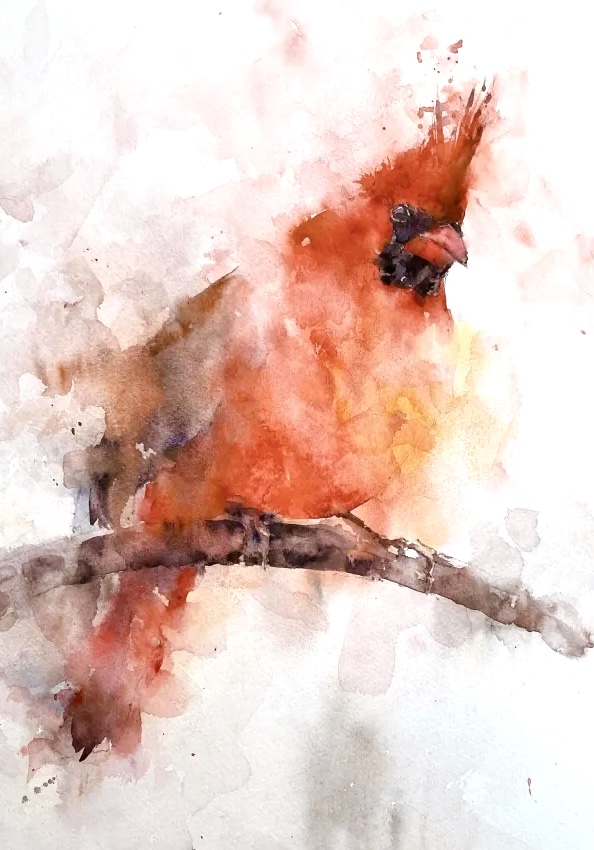
A watercolor cardinal bird is a fantastic way to paint loosely and expressively. In fact any bird watercolor lends itself to this technique and is great fun to boot. In this post I will take you through painting this easy watercolor cardinal and I hope you’ll be able to follow the process. If you’re looking for cardinal painting ideas this is a great technique to try.

Working on 140lb cold press Fabriano Artistico paper (here is my full materials list) I first drew out just the essentials. Some detail in the head and light marks where the wings and breast feathers would be. The feet and perch were just outlined and I was careful not to draw in every claw and wrinkle. In particular in this cardinal watercolor painting I left the belly and the back drawn in very lightly. These are areas that won’t need much definition and we’ll likely leave these loosely defined.
Bird art gives us watercolor painters a great opportunity to exploit the sploshiness of watercolor. Whether you’re just painting a study or for fun, or trying to produce an original watercolor painting as a gift it’s a great technique. For the first washes I kept the paint fairly light and made sure I didn’t leave any hard edges. This meant putting down some dabs of paint and then using a clean damp brush I softened those edges and really pulled that paint through the outline of the bird.


We’re painting a red cardinal and I just adore this color. I mixed my two reds together to get this – some vermillion and some permanent rose. If you don’t have vermillion then another orangey red like cad red light or naphthol red will do. Similarly another pinkish red like quinacridone red can be substituted for permanent rose.
It’s really hard once you have a drawing down to paint through those lines. Try and fight that! Pull that paint out into the background. You should be using fairly light value paint and softening all the edges with water so it will dry back far lighter. In later stages we’ll go back in and define some of those lines but for now you have a lot of leeway. In the end our cardinal watercolor will benefit from this layer as it softens the effect of the edges we will put in next.
The only part of the drawing I keep an eye on is the face. I want the contrast to be nice and crisp in here so I’m careful to not put paint in this area. If it does happen don’t panic! If the paint is still wet a few dabs with a paper towel will lift most of it off.


When doing a bird painting I often leave the face detail to quite late along in the process. For a loose watercolor, however I want to put in some detail quite early. This gives me a chance to assess how much detail I want in the rest of the painting. I want everything to be suggested and soft unless absolutely necessary. If we don’t have some detail to compare to there’s a risk of tightening up everything too much

Now we get to put in some darks on the rest of the bird and define some edges. I want to put in the bare minimum here so I’m not outlining the whole bird. I pick and choose where some contrast is needed and am constantly squinting and standing back to assess each mark. Less is definitely more here! As soon as the form of that bird appears you’ve probably done enough. If you’re experimenting however you can push it as far as you want. In some ways you have to overstep that mark to learn how little you can get away with. Yes, you’ll mess up a painting or two but it’s a great learning experience.

I wasn’t too happy with the shape of the bird at this point. A cardinal bird has an almost triangular shape to the head so I went back in with some of the darker red and extended the head and shoulder regions. Much better! I also made a slight adjustment to the tail and bottom area so he actually looked like he was perched. Yes we’re doing loose watercolor but it doesn’t mean everything is forgiving. Sometimes those small marks make a difference.


We’re almost done now. A little more definition went in the head and around the eye. Also a little more shadow under his wing and on the perch. I left the feet pretty loosely defined. I’ve been bitten before on many occasions by putting too much detail on the feet in a bird painting. The feet are almost never the focal point for birds and today is no exception. A final few flourishes on his head with a little splatter for interest and he was done.
As always there were a few sticky moments but we pulled through. I almost always enjoy a watercolor cardinal painting. The shapes are so great and the colors wonderful. It had just the right amount of looseness but enough detail in the right areas. Pretty happy! In fact every year I keep meaning to print some Christmas cards from some of my back catalog. Cardinals are perfect for this and, as it’s only February, I might have a fighting chance of doing it before next winter.

If you like this style of painting I have another real-time walkthrough and video of a toucan. Also some more examples of my loose watercolor birds are this kestrel and these bee-eaters.
I recorded the whole process on my youtube channel and you can also view it below. If you would like to see more demos please subscribe or see all of the videos on the website here. I hope you enjoyed this watercolor bird painting tutorial. If you try it I would love to hear from you.

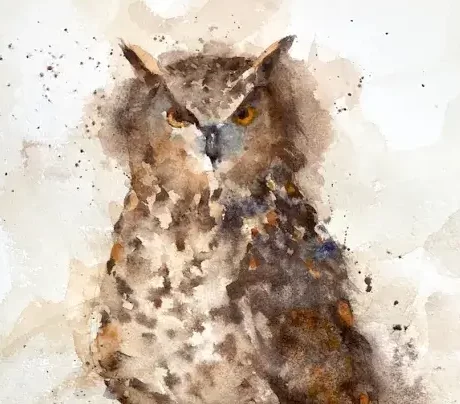
It occurred to me that I hadn’t painted an owl watercolor in a good while. I wanted to do something that was more loose and sploshy than usual. Teaching demos tend to make my painting tighten up quite a bit and I needed to shake things out a bit. I’ve painted a variety of owls before – barn owls, saw-whet owls (a favorite), and this one – a horned owl (eagle owl?).
Painting a watercolor owl (in fact any bird) is often scarier than other paintings. The drawing has to be accurate without getting into much detail and the markings can obscure the underlying form of the bird. Watercolor painting is unpredictable at the best of times and with owls doubly so. But I’d decided on an owl so an owl watercolor painting it should be.
I roughly marked the paper (Fabriano Artistico 140lb cold pressed) into quarters. This allowed me to get the proportions roughly right without having to put graphite grid lines all over the paper. Not really necessary but I wasn’t taking any chances. I lightly drew in the main form but with no detail in the feathers.

Before even putting brush to paper I planned out the values. The light was coming from the left so the right side of the bird was in shadow. I mentally made a note of this and kept this in mind as the painting progressed. When painting loosely in layers, and with such a lot of patten in the feathers it can be easy to lose track of the values as you paint.
As I was aiming for a loose painting I started with a very loose wash of mainly burnt sienna with a touch of ultramarine. I kept away from the face but pulled the paint out through the edges of the bird. This is very light and will only show slightly in the final thing. It also takes some of the glare of the white paper away, softening the effect. As the first, very loose layer was still damp I put in a darker wash over the shadown side of the bird. This started to show the form but was still very light and nowhere near the final value.

Again while the paper was still damp I built up the form further on the shadow side. There’s a lot of feather pattern in there so my marks were choppy but soft and I took care to leave lighter areas. I used my spray bottle a little to add some texture and dropped in slightly thicker, darker paint to darken some areas. At this point I was chugging along and fairly happy.

The next stage was starting to add some detail. I went into the face and added the eyes, making sure they had shadow at the top where the ‘horns’ were. Adding the pattern to the feathers I started to falter a little. I wanted everything to be loose and soft but probably rushed this piece a little and my confidence started to wane.

Well I’ve started so I may as well finish this. More color in the feathers and more darks to make sure the shadow side really looks like it’s in shadow. I added some color to the feathers and added some more darks around them to make sure they stood out. A little more work on the feet and the rock and I was almost done.

Still not very happy at this point. Standing back I noticed the shape of the head was a little off. Some softening and modification to the sides of the head and I was a little happier. As a last resort I added some paint splashes. So am I happy with it? Hmm – not really. It does have the looseness I like but I lost something along the way. Never mind – there’s always tomorrow.
As I’ve said on a number of occasions watercolor birds are hard even though I do a fair amount of bird art. A little disappointed I have to say. Some of my best work has been of owls. We have one of my early ones up on the wall and I’m not sure I’ve ever surpassed it.
Well they’re finished. Probably a little tidying up to do tomorrow but almost ready to go on the wall.
A few intermediates.


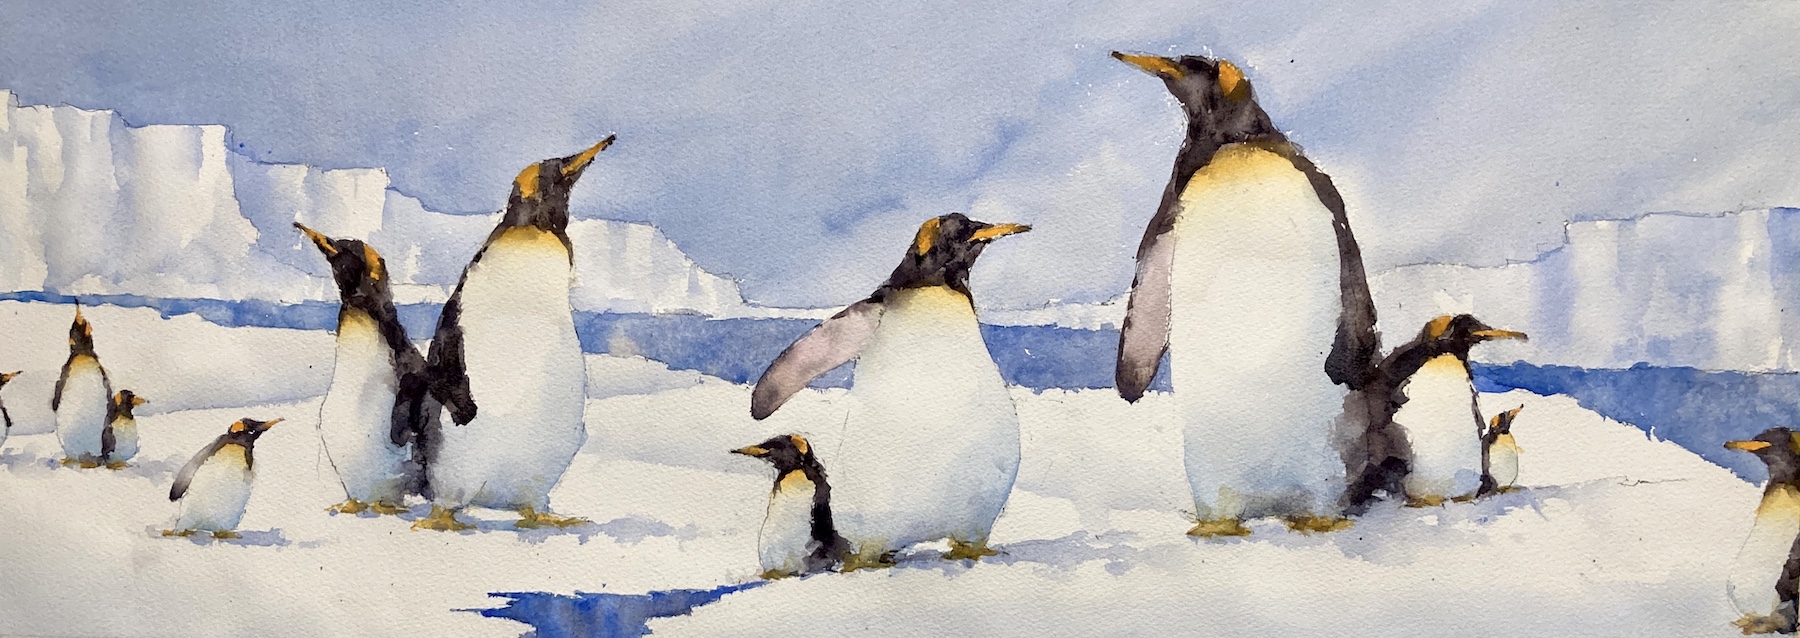
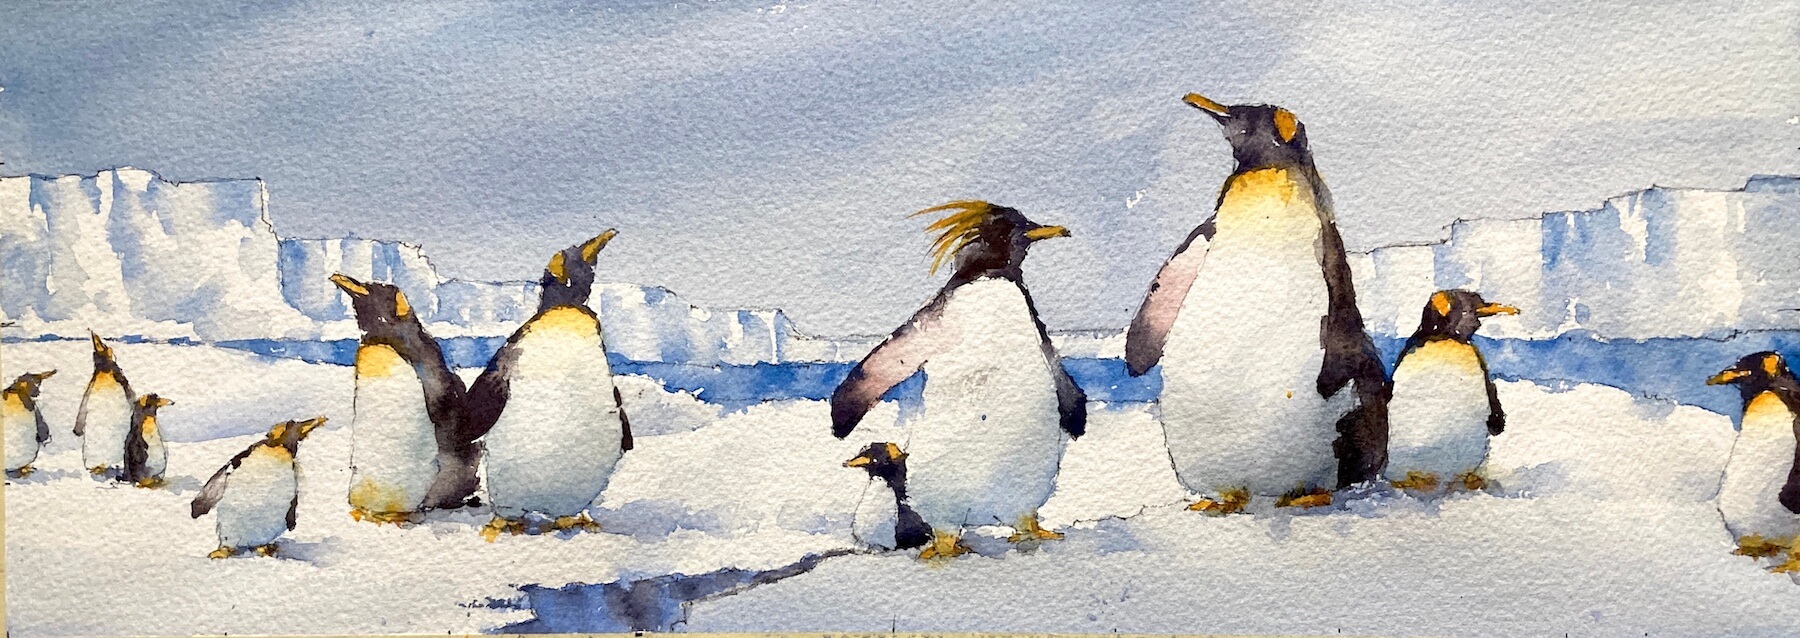
Today was time to get back to the penguin watercolor painting. I had a piece of paper ready cut but it had curled too much to paint on. So while I was waiting for it to flatten out overnight I used the offcut to do a quarter size test study. This is 6″x17″ and the final thing will be 32″x11/5″ which will be a pretty big scale up.
I’d done some sketching out of the composition on the ipad a couple of nights ago and was pretty happy. Everything is out of my head and from experience of previous paintings. I’m still wondering whether a few extra penguins will make their way in there but it hangs together pretty well so far.

First the drawing.

Looks ok so far. The shapes are good. There’s lots of overlapping shapes and the background cliffs tie everything together horizontally.
Now into the painting.

The sky went in ok. I was thinking of maybe masking the cliffs but in the end it wasn’t an issue. The darks of the penguins look good. Not a lot of detail here. All the work is being done by the shapes.

I’m pretty far along here. Everything went pretty straightforwardly. Just goes to show what a bit of planning can do. I’m still wondering whether to add in a couple more penguins on the right. And those two wings in the center two penguins are a little too similar so that might change.
And the final thing