See how to make a watercolor fox easy with this step by step watercolor tutorial and video. Complete with reference image and color tips.
Why Paint a Watercolor Fox?
It’s been a number of years since I’ve done a red fox watercolor painting and I thought ‘why not have another go?’ Watercolor animals can be tricky to paint and I’ve discovered that making a good drawing helps enormously. If you want to have a go at this painting I recommend using the grid reference to give you the best shot at getting the proportions right.
Sign up for updates on classes and free livestreams
Masking tape if you’re using watercolor blocks or you want a crisp edge to your painting.
Watercolor Fox – Reference Image
Watercolor fox reference image with grid
Full YouTube Watercolor Fox Video
The screenshots below are taken from the full youtube video. This takes you through the whole process in real time and should allow you to paint along.
Pencil Drawing for the Watercolor Fox
Watercolor Fox Pencil Drawing
Let’s get started. I first started with a pencil outline drawing. There’s no shading in here as we’re going to put all the light and shadows in with paint. I did try and get the shape of the snout and ears right. These are important to convey the character of the animal and are quite subtle. Any small discrepancies can change the whole feel of the painting. I also put in the position of the eye and a lighter line separating the light part of the snout from the shadow. This will be an important part of the painting which will give the fox three dimensionality and also give a feeling of sunlight. If you’re looking for an easy way paint a fox getting the drawing right can be half the battle.
Sign up for updates on classes and free livestreams
First Plan the Main Values
Watercolor Fox Values
A little planning helps enormously when painting in watercolor. Everything goes so fast once you start putting paint to paper. If you can work out some wrinkles ahead of time your paintings will benefit hugely. Figuring out the main values in your subject is one of the the first things to do. an accurate value scale is invaluable here and I recommend the Paul Centore value scale available from eBay
Paul Centore Value Scale
The other tool (which you can make yourself) is a ‘color isolator’. This is just a piece of card or paper colored a mid-value gray. It has a 1/2 inch square cut out of the middle. The gray helps us separate the color we’re looking at from it’s surroundings (hence isolator!!!) and the mid value helps us estimate how light or dark our color is. If you have a printer you can download the image below and print it out and make one yourself.
gray color isolator
Fox fur values
Now we can estimate the main values of our red fox. At the very minimum we need to know a value for the light side of the head a value for the shadow side of the head. If we get these two values right then we’ll be in great shape to make our fox look three dimensional. Our fox has a value 8 on the snout, a 6 on the head, a 3-4 in the shadow part of the snout and around a 5-6 on the shadow part of the white fur. Let’s keep these in mind as we do our painting.
Start the Fox Watercolor with the Light Values
Watercolor Fox First Layer
We’re going to start the painting with the light orange values on the head. We know the lightest value is an 8 and it goes to a 6 on the top part. This color is very close to burnt sienna and adding in a little of our orangey-red makes it bang on.
Orange fox color
We put the color on the head and make it slightly lighter on the snout. I use a second, clean, damp, brush to soften the edges where it transitions into the white fur. The top of the head is a little too light at this stage but we can always come back and darken that later.
Add a Light Gray for the White Fur of your Watercolor Fox
Fox fur value
We now mix a light gray for the white fur of the fox. Most of the white fur is in shadow so it’s going to be a blue-gray and we know it’s around a mid-value. I mix up a gray with ultramarine blue and burnt sienna and add just enough water to make it a value 6 on our value scale.
Fox watercolor fur painting
I paint in the gray over all the shadow part of the white fur and, again, soften the edges with a damp brush.
Add the Shadows to Your Fox Painting
Watercolor Fox Painting the Shadows
When the light colors are dry we can start to put in the shadows. The shadow size of the snout is quite dark – around a 3. I mix up a value 3 with burnt sienna and a little ultramarine blue and paint it onto the shadow side of the snout. Beware! It will look really dark and it will feel wrong!! If you’ve measure and mixed things carefully, however, it will all work out in the end. One thing we do have to take care with however, is to use our damp brush to soften the transition between the light and the shadow areas. We don’t want this to be too harsh a transition. A little softness here will make things look a lot more believable.
Fox watercolor paint mouthWatercolor fox paint ears dark
A similar dark brown value gets put onto the nose and the lineof the mouth. Again the edges are softened to make the transitions less harsh. A little dark color is also put around the eye to make it recede.
Sign up for updates on classes and free livestreams
Paint the Eye on Your Fox
This next piece usually brings the whole thing alive. We’re going to paint the eye. In this reference this is quite tricky. The surround of the eye is really dark but the eye itself is only a little lighter. Here is a close up to show you.
watercolor fox eye close up
You can see that only part of the eye is very dark (at the top where the pupil likely is) and the rest is the same value as the surrounding fur.
Paint the Ears In a Dark Value
Paint ears darkThe inside of the ears Add extra value to head
The ears are now painted in a similar dark brown (burnt sienna and ultramarine) value. At this point I thought the top of the head was too light (it should have been a value 6 and was more like an 8). I mixed up some more burnt sienna/vermillion paint and made that area darker. The extra paint also allowed me to add in a few stripes on the fur to show few of the modulations on the head.
Correct the Value on the White Fur
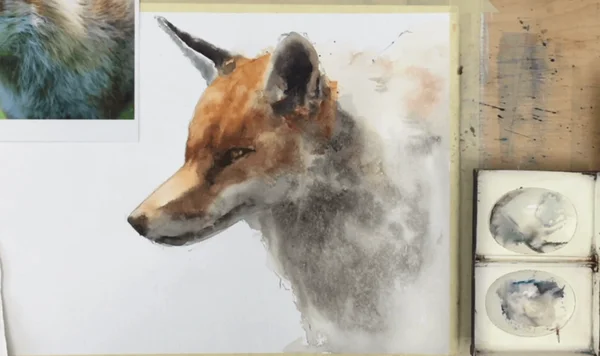
Darken the white furAdd value variation in the furAdjust the value in the ear
We’re almost finished now. Things were looking pretty good but the white fur looked a little light in value. This is always a scary bit as correcting this can look too dark when the paint first goes on. I mixed up some neutral gray (around a value 5 or so) and painted over the whole area of the white fur. While the paint was wet I dropped in some darker paint where the fur was darker and used my spray bottle to add some texture. Thankfully this all worked out and it definitely improved the painting.
The final changes were just to darken inside the right ear a little and the whole thing was finished.
fox watercolor by Michele Clamp
Final Thoughts
Well I think it came out pretty well in the end. Shadows on white fur are always a little scary as the paint we have to use always looks darker than we thing we need. But some careful measurements and observation and all turns out well.
I hope you enjoyed the demo. If you try it or have any questions I’d love to see what you do. It’s been a lot of fun painting this cute fox watercolor and I think a wolf watercolor will be on the cards in the coming weeks.