Charles Reid Workshop – Day 3, Still Life

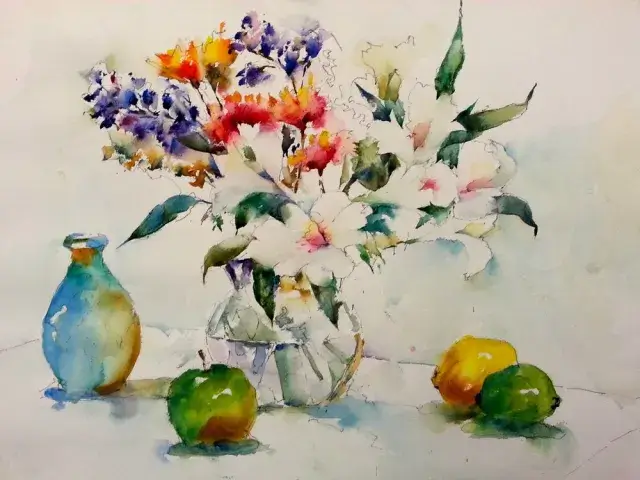
Results of day 3 – I’m pretty chuffed with this.  No Charlie the seagull though.

Full story :

Charles Reid workshop from the back row

Day 3 – still life day.  And there was his seagullness himself.  And doesn’t he look fine?

So today was flowers, fruit and stuff.   I’ve been looking forward to this one especially (and not just for the seagulls).   Flowers are not my favorite things to paint, mainly because I’m crap at them so I was all eyes and ears to see how Mr Reid went about things.

btw – this was my view from the back row.   This would be pretty useless apart from the fact I’d bought some small binoculars with me.  They are fantastic!  It’s like being 6 inches from the paper.  You can keep your front row seats.

Charles Reid still life drawing

Anyway – on with the demo.   First the drawing as usual.  He was using a different paper today – Schut paper.  This is dutch and not widely available in the US.  It’s not cheap – about twice the prices of Arches – and it has the distinction of being Judy Reid’s favorite paper.   Apparently it is very absorbent so doesn’t allow much lifting or reworking which isn’t a problem with Mr R’s technique.  It also has an interesting texture.  It’s supposedly rough but it didn’t look like the usual rough texture which has a pronounced tooth to it.   The tooth was less pronounced and coarser grained which allows for interesting brushwork without feeling like you’re painting on a brick (something which Mr R. said about Arches 300lb rough.  Chortle!)

There wasn’t as much description going on today as there was with the figure painting and Mr R pretty much just got on with it.   First there was 30 minutes of contour drawing.  Emphasis on drawing connected objects,  joining shadows to objects and giving as much, or more, emphasis to the inside shapes of things.

Charles Reid still life setup

The setup – with seagull.   Mr Reid is a big fan of a non-arranged arrangement and likes to paint things that look as though they’ve just been left there.   He also likes things that just happen to be at hand – hence the paint brushes and tubes and the Edward Hopper book.

Charles Reid still life in progress

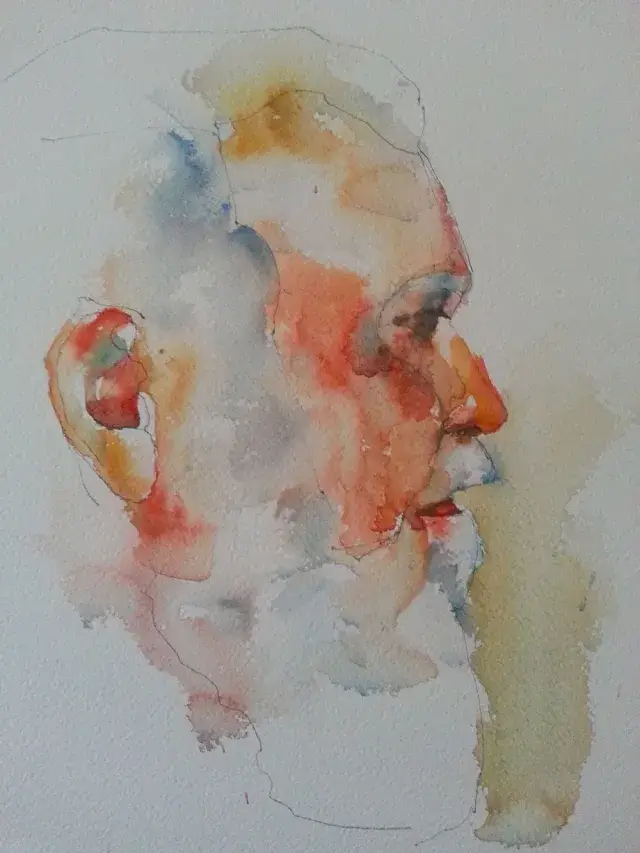
An action photo.   He sits very close to the subject and very low down.   This gives his figure paintings a distinctive look – the model is above eye-level with a good view of the nostrils and a relatively small head due to the perspective.   For the still lives this effect is less pronounced.

Charles Reid still life towards end of first painting block

Towards the end of the first 30 minutes of painting.  Everything is pretty much painted just once and left.   He leaves a lot of white space which certainly isn’t evident in the photo but gives a liveliness to the painting.  He’s also extremely careful about where he places his darks. For white flowers the dark leaves a pretty much all that defines their boundaries.   Similarly he treats his edges with great care – which ones to keep sharp and which ones to keep soft to just give an impression.

Charles Reid still life flowers finished
Charles Reid painting showing Schut paper texture

You can just about see the effect of the Schut paper here.   In the lighter areas you can see the coarse soft tooth – it gives a mottled finish to the paint.  you can also see the amount of white space he’s left in the foliage.

Charles Reid still life painting

Here we are almost finished.   He got rather grumpy at this point.   The art center is having some renovations done in the basement and they were putting up drywall.   This apparently involves the use of a tool that sounds like chairs scraping across floorboards every 5 seconds and gets really annoying.  About 5 minutes after this Mr R. got up and refused to do any more. Don’t blame him really – it was very annoying.

Close up of the still life painting
Close up of tablecloth portion of the painting
Finished Charles Reid still life painting

The finished painting (completed after the drywallers had gone to lunch).   And very nice it is too.

Critique Time

Each of us had a critique of one of our paintings over lunch.    He was very kind to everyone but not to the point of abject flattery.    If your painting has a person with a head that’s five times the size of their feet he will point this out as probably not the best feature of the painting.  But we don’t really need to be told that.

Now it’s our turn

So – on to the still life.   There were 6 different ones set up around the room.  I wanted Charlie the seagull but the front row people had the first choice so I didn’t get the chance.   I did want an arrangement with a lot of white flowers however so I plumped for the one below.   I was sharing this with other people and they decided they wanted to clump all the fruit together.  I really didn’t want this – I wanted the scattered approach with different objects linked by shadows.  I snuck in the lemon and lime on the right hand side and chose to ignore the squash things.

Afternoon still life setup
My still life drawing

The drawing – I’m usually pretty happy at this stage.   This took around 30 minutes to do.

My still life - start of the painting
My still life – start of the painting

The start of the painting – probably after around 45 minutes.    This was an extremely difficult painting to do and I concentrated extremely hard.   I usually finish a painting in well under two hours but this was close on a 3 hour job and I hadn’t really finished then.

Having said that I really learned a lot in this afternoon’s session.   It felt like putting a puzzle together.  Where do I place the leaves to make sure the flowers stand out?   Where should I have sharp edges to the flowers and where should I leave things soft?  Where do I put broad strokes and where to put detailed ones?

Michele Clamp still life finished

The finished piece.  (There are a couple of gaps but I ran out of time).     This is a huge improvement over my previous flower pictures.

Oh – Charles patted me on the shoulder and said ‘beautiful painting’.  <Blush>

Charles Reid workshop - the layout
Charles Reid workshop – the layout
All of us at work
All of us at work
Still at work
Still at work
More of us at work
More of us at work

Finally some action shots of all of us at work.    I think everyone had a pretty successful afternoon.

Right – I’m off for a well deserved Ruby Murray courtesy of  Falmouth’s finest Indian establishment.

Charles Reid Workshop – Day 1

My results on day 1 – the full story is below.

Boris the mini car
Boris the mini car

Arrival at the Falmouth Art Center

So the day finally arrived for the Charles Reid watercolor workshop.  Boris the mini car was loaded up and at 8am off we went to Falmouth Art Center.


I was almost the first there – we wondered whether we’d have to paint the ladder but it was only there to adjust the lighting.   The Center is impressive – large and airy and obviously quite new or at least newly renovated.

Falmouth Art Center workshop space

Meeting Charles and Judy Reid

After coffee and complimentary bagels Judy and Charles arrived.    Judy is obviously the organizer and keeps everyone informed as to what is going on.  She shuffled us around a bit so we could all see while Charles settled himself in his chair in front of his easel.

Charles Reid about to start drawing

Starting the Portrait – the Drawing

Our model (Katrina – like the hurricane) sat in 15-20 minute chunks while Charles drew and explained what was going on.  Having read his books and watched several of his videos the information wasn’t completely new but there’s nothing like actually seeing someone draw and paint who knows how to do it.

Charles starts the drawing

He went surprisingly slowly  – this was after the first 15 minute section with just a rough outline of the head and more detail of the nose and mouth.

After 15 minutes - this isn't a fast process
After 15 minutes – this isn’t a fast process
Drawing after 30 minutes

Charles Reid starts the Painting

This was after 30 minutes – most of the time was spent on the features with the hair and shoulders put in in a couple of minutes or so.    Looking closely at the drawing there are surprisingly few lines.  He strongly urges us not to ‘sketch’ with multiple feathery strokes but put down decisive lines.   Even so the sparseness of the drawing was surprising.

The time went incredibly quickly.  I thought only 5 minutes had gone by when the buzzer for the first 15 was up.    Amazing how absorbing watching someone else draw is 🙂

More drawing from Charles
Light washes over the face

Charles puts in a light underwash

Finally onto the  painting.   After saying that he usually doesn’t do an underwash he proceeded to do just that.  I can’t remember the rationale but it doesn’t really matter.   He used cadmium red, raw sienna and cerulean blue and a fairly large number 14 brush to put some warmth into the face and some color into the hair and sweater.   With these washes he didn’t keep to the outline but pushed the washes into the surrounding areas.

Close up of the underwashes

Painting the Features in a darker mix

After another break and when the wash was dry it was straight into painting the features.  He said he usually starts painting at the same place he starts drawing.  In this case it was the nose and mouth but in other cases it could be the eyes.  He was careful to stress that there was very little water in his mixes and it was interesting to see how he got value changes.

He started by putting in the cast shadow under the nose in a dark mix of cad red,  cerulean and raw sienna.   Then he took a slightly damp brush and pulled the paint out into the other areas of the nose and face.  This enables him to get unified color but also a good range of light to dark.

Starting to put some darks into the face

He paints as he draws – extremely slowly and carefully.   The nose and mouth stage above took another 20 minutes.   As with the drawing he stressed that we shouldn’t follow the outline but leave gaps and soft edges to indicate form.

Cheek and face shadows go in

The next two parts were the eyes and then the planes of the face.   For the eyes he went straight in with the dark of the lashes and the iris.   The iris he put in in small dots and leaving some white of the paper. Then he goes back in with a clean damp brush and softens areas by pulling out the pigment.   Interestingly the white of the eye he put in as quite a strong raw sienna.  It looked out of place when it went down but looked fine when the rest was filled in.

The side of the face he put in with an extremely strong and apparently dark mix.  Again this dried much lighter (although I’m not sure it was completely successful).

Final Charles Reid portrait

 Finally the hair and the sweater was put in.  This was done comparatively quickly and he made good use of his fingernails to scrape out the light regions.

Not bad huh?

Then it was our turn – my version

My portrait drawing
My portrait drawing

After lunch an extra model arrived and half of us sat in front of her and half in front of Katrina again.   I chose Katrina as I wanted to put into practice the advice Charles had given us in the morning.   It took the first twenty minutes to do the drawing.   I felt reasonably happy at this stage.

Oh and Charles’ comment  – ‘Good drawing’ 🙂

My portrait - start of the painting
My portrait – start of the painting

After the underwashes as he had done it was time to start on the features.    I felt that I was working extremely tentatively and would have liked some stronger color but the features came out pretty well.  

My portrait - putting in more of the features
My portrait – putting in more of the features

It’s probably hard to tell the difference between this and the previous version.  I was getting a bit jittery and didn’t want to muck anything up.  I did strengthen and warm up the shadow underneath the nose as well as add some subtle washes to give form to the nose and brow area.   The eyes I was pretty happy with. I tried to follow Charles’ advice to put the iris in with dots and leave white space.   I think it works well.

My portrait - final painting
My portrait – final painting

At the previous stage Charles came round and said that I should leave it pretty much as it was.   I should leave out the hair and sweater and even the shadow on the side of the face.  He did suggest putting some color into the cheeks and calling it finished.  Which I did.

My portrait - second version
My portrait – second version

I was then at a bit of a loose end and there was about an hour to go so I started a fresh painting aiming to put in some bolder color and have a go at the hair.    For a quick rendition I was pretty happy.

So that was day one.    I enjoyed every minute of it.

Charles Reid – Watercolor Solutions Exercise

A bit more practice before next weeks course.    I’m doing everything by the book  –   careful contour drawing,   clean palette with no puddle colors,  mixing mostly on the paper and not on the palette.   I’m consciously using much brighter colors than I would usually (on Mr Reid’s recommendation) and I think it’s paying off.

Charles Reid portrait exercise - take 2
Charles Reid portrait exercise – take 2